Earth Molded Concrete Sculpture:
Artisan Secrets
By Bo Atkinson
My attraction to sand molding is the versatility and speed for casting concrete.
The requirements can be as little as raw ingredients, minimal tools and
rudimentary
textbook information. Earthen molds can really be of any sand or loam, mine
were usually sandy , usually unsifted and pebbly. This report describes
a simplified
method of concrete casting for sculptural purposes. I used simple mixes, seen here. I used My method was developed
both by the need for making a living and by a love for the flowing cementitious
processes. The following methods grew gradually over the years (since the
1980's). Technological text books were studied and applied. Primitive arts
were also considered
and
tried. Experiments tested new ideas. What emerged was a preference for sand
molding of relatively thin shelled concrete products.
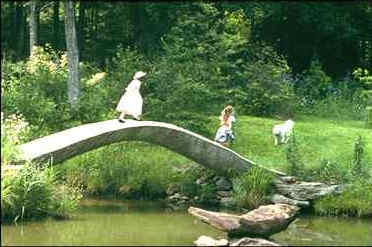
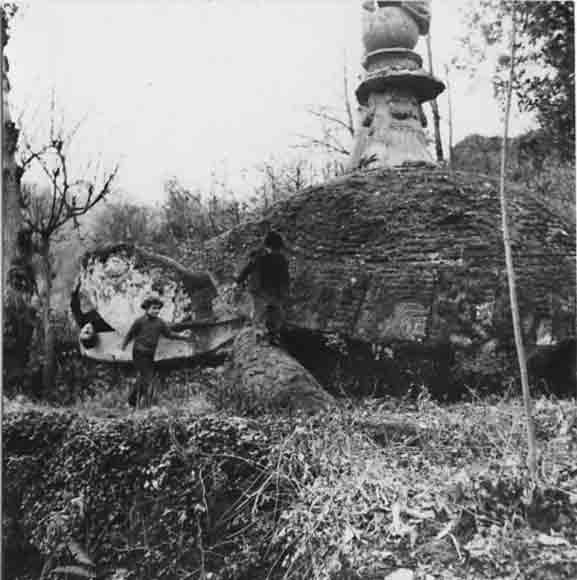
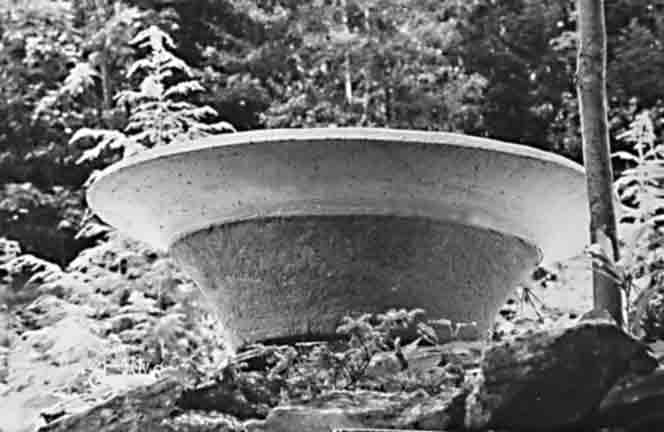
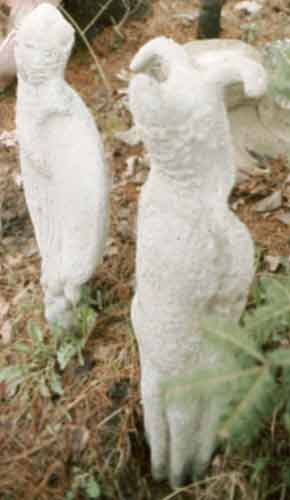
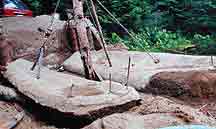
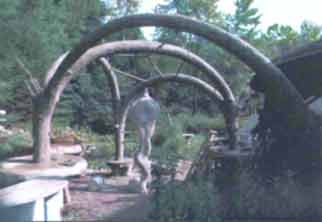
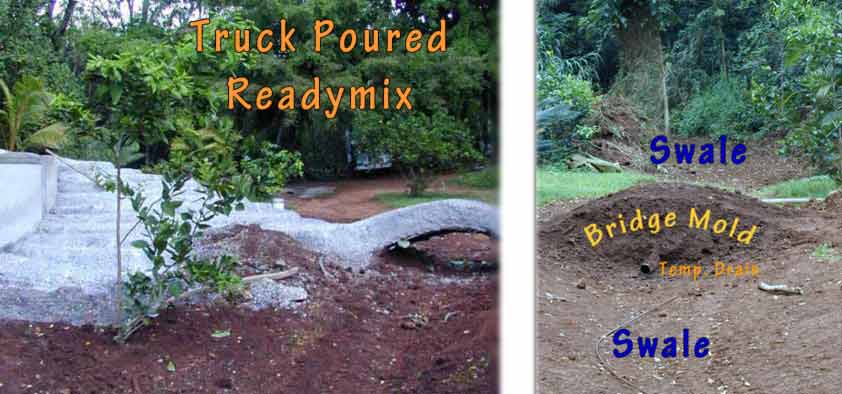
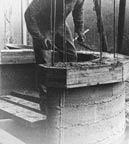
The bridge above is real with kids running over it during a birthday party.( It is a 20ft bridge arch of semi laminated Ferro cement, wheeled into place, one end on an axel. The ferrocement was used as a mold to fill with readymix, after placement.) Sand molding enhances unique versus mass stylized. A timeless appeal emerges versus factory dated commercialism. My family often explored interesting places like the then (1954), overgrown park called Bomarzo, pictures below.

My appreciation for timeless mysteriousness came from growing up as an American child in the ruins of Rome (Italy). While archeology puzzled over datum and lineage, gardeners and kids enjoyed the found shards for decoration. We saw some large, dateless highway stones, smoothly worn by chariots, just getting land filled one day! We brought them home for garden seats!
More pics on google images. Slaves are said to have carved the Bomarzo statuary from stone but this timeless style today is economically feasible by use of earth molding or sand molding methods.
 -
- 
My article on sand casting concrete sculpture follows below. I am very glad to hear inquiries about my availability to work creatively. I'm also glad to receive comments on my web pages, pro and con. It all keeps me focused on writing more. : Newer email: boa1 at pivot dot net (Fix punctuation)- - - Thanks Tel : 207 342 5796 . . . (Maine, USA) To build a symbol hire a sculptor .
Earthen and sand molds
date to ancient times and were adapted for ceramic and metal casting from readily
available soil and mineral. With modern industrialized mass production, these
methods were reasonably forgotten as civilization hungrily needed mass production.
As surpluses from mass production become commonplace, the demand for unique
art forms again arises. The principles described in this article could be adapted
at a small or large scale with little investment required. I try to write this
article to fit many interests, from beginner to widely experienced persons.
Please bear with it.

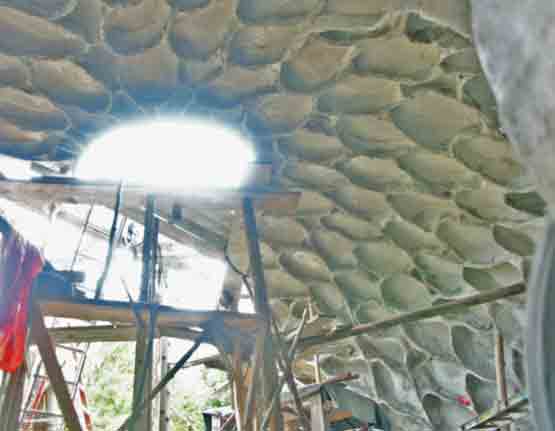
Click here to see how I formed a 33ft/ 10M dome building with innertubes!
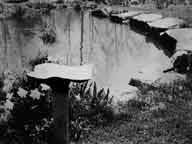
My approach to sculpture production and sales was very low budget and also a
one man operation. During the 80's and 90's, a reliable income was made selling
sculptural concrete birdbaths, fountains, furniture and small structures. This
occupation allowed some experimentation. Concrete durability was proof of the
methods described. I also built some ferrocement, FC additions to my own house
in the late 1970s.
(Click here
to see my photocopy catalog used for many years).
(Click here to
see my FC house addition work in the 1970's).
My earliest cement work used laboriously tied mesh in ferrocement (FC). I also
did furnace and foundation work with wooden forms and other mold materials.
Casting cement in reusable molds began to feel creatively restrictive to me.
Too much wear, tear and clean up, storage space and work effort to maintain. Factory-perfect mass production as a model tp follow was not appealing. Rather than repeated
productions from the same identical form, the idea of sculpting recyclable forms
began to appeal to me. The shapes could vary in countless ways which also appealed
to buyers. Also the earthy texture on product surfaces appealed to me, since
it is simple to do and also gives an antique quality agreeable with stone. Late
in the 1970s, I found that simple birdbaths, taking few minutes to produce,
did look good and unique and could easily sell with a reasonable profit. The maintenance of a molding bed was so
simple: organizationally, aesthetically and ecologically. More time was available
for truer interests and needs. Also, world consciousness was beginning to question the validity of totalitarian commercialism.
 -
- 
Slurry And Sand Trick
Sand casting concrete
plays on a very advantageous trick. It is really juggling with the three states
of matter: solids, liquids and gas. In brief, water is used to bond the sand mold,
when building the sand mold. Water distributes sand particles into compact
arrangements
which hold for molding purposes. Instead of laboriously prodding stiff cement
into air tight cavity molds, a very soupy mix can be poured into a breathable and
thirsty earth mold. A wet, soupy mix, (a slurry), easily pours into cavities
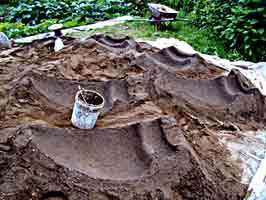
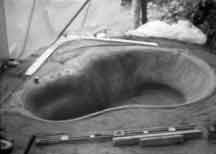
of a mold, or over surfaces like bird bath molds. My birdbath molds are simple hand
patted
sand mounds. Cement simply pours over and readily "skins" the sand
surface. Where cement touches the sand, the excess water quickly seeps into
the pores of the mold, (cement particles do not seep between sand particles) . This in turn stiffens
the cement which is draining the excess water. Furthermore the excess water
aids the temporary sand-mold constitution. More steps are required.
Vertical sand mold walls are more difficult,in that the easy method of submerging mold surfaces is not possible with large, vertical wall surfaces. I have readily applied soupy cement slurries by flinging soupy-wet cement, with large paint brushes. Spraying is the more technological tool for this, where bigger scales of operation are needed and where labor cost is higher than equipment. But large brushes and careful timing allow considerable production. (Once a slurry of cement plus sand does skin over a considerably vertical sand mold surface, thicker cement or concrete can be carefully flung or placed as a second coat). Back to the "trick". Plenty of extra water is added during slurry mixing which, by the way, eases mixing generally. Excess water in a mix is normally very bad practice, (for thick, one step pouring). But conscious-pouring of this soupy mix on to a ready sand mold is an exception to the rule. Wet cement in contact with the sand mold de-waters. The cement not closely contacting the sand remains soupy. After a few minutes, the cement in contact with the sand mold has leaked it's excess water into the sand, which firms up the loose sand mold face and also firms up the cement..... This fluid concrete/ cement is easily evened out The drained portion holds reasonably well to the mold. The remaining soupy mix is either spread over to remaining portions needing or the excess soupy mix is removed from the mold.
 -
- 
Low Slump Ideal
A closer consideration reveals that a thin coat of low slump cement forms at the sand mold boundary. Low slump, (fresh and stiff), of course is the ideal cement consistency for curing. At the same time, fresh mud initially tends to remain wet at a layer above the low slump cement, (above the drained or de-watered cement). The excess slurry- wet cement is easily swept along by a rubber gloved hand. The excess water eventually needs to be removed either by the mentioned de-watering or evaporation, or by removing overly thick sections of fresh wet mix. Herein is the means to control thickness of a thin shell, hand worked product. Countless factors effect this method, like ambient temperature, humidity, sun or wind exposure, etc.. Suffice it to say that smoothing should not be prolonged nor should mud quality be misdiagnosed.
 -
- 
The normal tendency of cement thixotropy or gelling must not be confused with
the desirable low slump ideal. My method is to soon begin patting and smoothing
the fresh surfaces, all over the fresh pour. Aggregate from 50% to 80%
of the
thickness of the desired shell thickness is a great help in sensing and controlling
the finished thickness. (Relatively large aggregate also conserves cement
for
cost savings and reduces environmental impact). When wet, thickness sized aggregates "touch bottom" and
can be sensed as a gauge at all points along a curved surface. A combination
of patting and smoothing quickly establishes this.
Patting is here the equivalent to screeding, tamping and floating used in regular
concrete-slab work. Where wet fines quickly work up to the surface, the patting
is
gaining. The better the compaction, the denser and stronger the result will
be.
 -
- 
Well graded mixes seem to de-water even when larger aggregate is used. (Well
graded mixes generally mean that aggregate particles of all sizes are included,
from large to very fine). A simple slump test can be made by taking back some
concrete freshly from the mold and packing it into a mud ball. Toss the ball
up in the air, just slightly and catch again. Repeat a few times. If the ball
can hold it's shape well, you have an acceptably moderate slump mix. If the
ball too easily crumbles apart, the mix is too dry for sculpting. This is an
old method for testing mixes generally. Eventually, conditions are visually
apparent and easy to control. Ideal water content would tend to be near crumbly,
but that condition is barely workable. This is where sand molds fluidly shape
the finish while avoiding uncooperative crumbling.
Actually, the slurry application is not the only sand molding issue. It is the
easiest for surface forming. I also apply all ranges from wet to near low slump
mixes when in a hurry to use up surplus mix from more important work. Instead
of wasting surplus, I quick mold birdbaths on the side. The lower the slump, the greater
the attention needed to avoid altering a sand mold surface. Spreading stiffer
mix across the sand may drag sand and leave texture alterations in the resulting
surface... One can still sell items with these molding errors as bargain bin items.
Exception to exception..... If your mold is all pebble or with large stones intended to remain on the finished surface, then the lower slump, stiffer mix is essential. Slurries de-water much less on pebbly sand, and not at all on stony molds. A quick correction for a pour (which is not de-watering quickly enough), is to cover with dry sand. This absorbs the excess water away from fresh poured cement, even upwardly. Stony molds make appealing bird baths, especially when you have nice stones.
Experimentation and practice with birdbaths and basins is a invaluable start.
You may find that crudeness of your early work has an appeal for garden ornamentation.
Eventually, a serious user or sculptor should also consult standard concrete text books, as well as less formal writings and blogs, all
for a wider perspective in concrete practice.
 -
-  -
- 
Ice Test
For those tropical readers who may not know about issues of cold climates: Ice can break enclosures like bottles or engine blocks. At a temperature just below freezing, Ice goes through a volume expansion. This expansion doesn't necessarily bother gently sloped basins. But extremely porous cement items, (soaking wet, porous concrete), can become pulverized, through a freezing winter exposure. The exception here has to do with the size and shape of the pores. When the pores are microscopically small enough, surprisingly enough, trapped freezing water cannot perform this expansion feat. This was interestingly discovered in the sidewalks of New York City, where animal fats were used to lubricate the concrete mixers, (during the late 1800s). The small amounts of fat mixed in, regulated the pore sizes and tended to reduce capillaries. This lead to development of air entrained cement modifiers to control pore qualities and to better resist freezing damage and also to restrict penetration of other aggressive chemical agents (into concrete surfaces).
 -
-
I kept some simple, curved shaped un-reinforced birdbaths outdoors through many
cold winters to observe for possible freeze damage. These were plain cement,
not modified. None of these ice filled baths suffered frost damage and
none
of these had reinforcements. My rule of thumb is to reinforce basins over 2ft
in diameter with one ring, near the lip. Someone pushed one of my 5 ft
diameter
basins which fell 4ft and it only chipped in one small place. The only reinforcement
was the one or two wire rings. For more complex, and larger shapes, the
use
of additional rings appealed to me. >>>>Click here to see my current
research with rings as a primary reinforcement element.
 -
- 
Shrinkage
Low slump mixes with
the largest possible aggregate, well graded down to fine aggregates, shrink
the least during or after curing. If a relatively wet mix is left to cure without
de-watering, compacting or patting, then increased shrinkage of the wet volumes
will occur during the cure, (hardening of cement). However, if a simple birdbath
is uniformly constituted, (same wetness throughout), and if the shrinkage therefore
occurs uniformly, then chances are, all might not crack. The main fault with this small
scale birdbath shrinkage is increased porosity in the product. Increased porosity
suggests a weaker product. But porosity in stone can optionally be admired from
non engineering angles, if one can appreciate tasteful-imperfection. This is a broad ranging, off topic subject regarding aesthetics. Porous
stone has some practicality , as for bees and pollinators of the garden, (it
better suits their water drinking habits). Another engineering-caution regarding this, is that reinforcements
would in effect be compressed or reverse tensioned, a worse condition than un reinforce, small items.
Here, shrinkage and cracking could occur and expose metal reinforcement to corrosion.
An important note for larger or more complex work is that shrinkage usually
manifests as cracks, along the weakest sections. One should engineer the very
larger concrete pours with "expansion joints". These joints control
where the separation of the parts should occur due to minute shrinking. Shrinkage
is an engineering issue even with low slump mixes, for large work. In a compact
birdbath, this is of little concern. Chances are it could be of little concern
in large structure if provision was made for slippage of the receding edges.
In this instance, reinforcement would want to be of a post tensioning variety,
(non interfering during curing and tightened after curing). In FC, shrinkage
cracks can be so widely distributed as to be invisible. Highly distributed
reinforcement
can assist this distribution of shrinkage cracks converting them into widely distributed
pores. Such pores are not visible to the unaided human eye.
Forming Technique
How much force should one use in this work. The proper degree of force used must be learned by experience. Never so much force during cementing as to deform the sand mold beneath, and always enough to even out fresh pours. The cement should not be applied to loose, easily disturbed cement molds, while in gelled- thixotropic state. This quality-issue of cement-application, can not be emphasized enough and is the reason masons often agitate mixes just prior to cement application. Most graphic is to watch how quickly a plain cement slurry can gel if left to stand. This has nothing to do with cement hardening or curing.... The proper force to apply during cement molding is learned by experience of sand mold building. Here again, mold building uses patting and smoothing. Loose sand molds are the easiest to maintain and live with. (We might prefer to keep life easily manageable). The larger the work piece, the heavier the work load will feel. A human's comfort zone for labor affects this very much. We need to determine that comfort zone with practice and thereafter strategize our work loads for each day of work.

Methods will vary a great deal depending on project sizes. Bird baths, basins,
stone furniture, garden bridges, etc., are all easily formed predominately in
one sided molds with reasonable slopes for pouring, flinging or spraying concrete. Even house parts
can be sand bed cast and later tilted or hoisted into position.
In larger sizes of work, it becomes helpful to use shovels and feet in stead
of hands. The (shoed) foot is an excellent power tool. Through practice, the
foot can improvise much of the hand technique described above. For reasonably
sized basins and garden pools, the foot does excellent work. During hot weather,
freshly poured concrete can begin setting, (curing), fairly soon. Foot and shovel
can compact and smooth the pour quickly. By the time a person's limit is poured
warm and smoothed, fresh concrete can become hard enough to stand on without
deforming it. This refers to earth supported flat work. The texture may be rough
and may be acceptable as is, however thin coats with finer mixes can also provide
smoother finish. For cooler temperature pours, short boards or snow shoes can
be used to move around slowly curing surfaces for smoothing work.
Joinery And Edges
Joining fresh cement with older cement deserves consideration, even on a sand mold. Poured slurry readily de-waters, as noted. On a large mold, one might not be able to keep all edges of the pour moving simultaneously. Keeping all edges of the pour moving nearly simultaneously would produce an excellent finished surface. Where an edge of the pour halts for just a while it de-waters and gels. Later advancing of that edge needs caution. The leading edge of a slurry application tends to bulge so that the actual contact between cement and sand is slightly cantilevered or hidden. If this is neglected, a slight crevice might appear in the finished work. But extra wet slurry applied along this edge can reach the true leading edge and fill the void. It is also helpful to stroke the edge area after this to leave no crevice in the finished work.
The bulging effect just mentioned can be profited from in at least two ways.
The popular use is to produce the finished edge of your product quickly. With
practice, the bulge of the leading pour edge can be pushed to the desired location
of the finished product edge. This is a means to produce wavy, usually non-symmetrical,
unique edges. The looks can be natural as in life forms or primitive as in rough
hewn. The main point is that good control of the edge work can yield a smooth
edge with less effort, (than with more extensive form production). The second way to profit from the bulging and crevice
potential could be as follows. A very patient artist could develop a style to
use those crevices like line drawings. The finished work would have the crevices
all incorporate as a line drawn image. For that matter the piece need not even
be solid like a basin. It could instead be like a fluid carving, essentially
extruded like pastry toppings. This of course would require experimentation
and personal styling.
Laminating Cement Layers
Laminated layers are sometimes needed. The need can be as odd as a change of mind as to thickness or perhaps as a well planned method for adding mesh layers, to upgrade strength of a structure. The need can also be for a finish coat. In all cases it is desirable to achieve a solid product with the least voids between or with no voids trapped inside. Generally, it would seem desirable to apply additional layers the sooner the better. But mechanically, some form work is too fragile for immediate laminating. One might have to wait for full hardening due to minimalist, low cost forms. (There is also some conservationist rationale to consuming less form work building material, too.) Among the fragile types of form work, are large vertical sand molds. Laminating layers suggests two approaches. One is by spraying the other by hand/ trowel. The spray offers an interesting principle of small, high speed impacts of blobs of cement, raining in, to coat a surface, with smaller air or voids between the applied blobs and the surface. By contrast, the hand or trowel sized amounts of cement can trap larger air bubbles or voids. These trapped voids are unintentional. Voids can be best remedied by 'scrubbing' smaller amounts of cement on a surface before patting on thicker layers of lamination. Finer mixes of cement, higher cement ratio mixes, stickier mixes as with additives, all can help reduce or eliminate voids in general. The sprayer looses advantage on flat, horizontal work since there is always rebound, (courser particles bouncing off). This rebound falls back down without the velocity required for compaction. Whereas vertical spraying can reduce void forming, while the rebound falls to flat surfaces below. This presents more clean up and possible wasted cement. Horizontal spraying on a floor for example, can actually trap more inter-layer voids. All of this can be remedied. The comparative advantages are controversial, having to do with budgets for equipment and skills of operators. Most importantly, the scale or size of a job, the required speed of the work progress and situational constraints all affect the choice of method to use. Mechanization of labor speeds labor up and builds larger projects, but the smaller more gradual project has advantages for smaller operations, sometimes with welcome serendipity.
If smaller aggregate are used in two or more layers, then low slump, stiffer
mixes are preferable to finish with. Weather and climate have a huge effect here. Avoidance of trapping air or excess
moisture
between the two layers are both critical. Spraying or shooting cement avoids
some fuss, but does leave rebound to waste or to deal with. Hand or trowel
applications
need to 'scrub' or work the cement against the previous layer to
remove these voids. Application is easiest to a fresh layer since the fines
of both
may mingle and the larger particles may penetrate and thereby bridge the boundary layer. Application
to a pre-hardened layer, will depend upon the successful placements of fines
to completely cover the hard surface. This is difficult with stiff, harsh,
low
slump mixes, therefore it may be advisable to thinly coat the hardened surface
with a slurry of cement and have it just barely moist when the stiffer mix
is
applied. Experience is the best understanding. To build confidence in your
work, it is helpful to produce very thin wafers or cookies with your planned
mix.
The shape is not important, I just mold them by hand and plastic wrap or bury
in earth to hold moisture. Curing can be speeded with gentle warmth, providing
that drying is prevented. After curing the wafers are broken with your fingers
or tool if needed. Then closely observe, with lens to search for voids along
the fracture. Voids are either from trapped air or excess water. Likewise,
try
laminating cookies, using the exact methods you plan for your critical application,
including the cure scheme. After curing and breaking, the laminated test cookies
should reveal the quality of adhesion and voids between layers.
Wet Mix Considerations
For lack of good metering equipment, I generally mixed by feel, not by weight
or exactitude. My disadvantages should encourage a person to go ahead
and start
sand casting without too much worry about exact mixes or excessive details.
The hands on experience is the most important thing. For
sandy mixes- 2 to 3 sand to 1 cement by volume is a reasonable mix to
start
learning
with.
Precise
mixes are intended for larger scale efficiency, not a hindrance to beginning
the art. (Use rubber
gloves. I found all types useful, depending on circumstances. For general
Sand casting the thin latex type allow the sense of touch which is important.
I like to keep old, worn latex gloves over a solid inner glove. This conserves
on glove consumption.) 2008 page on Bo's cement mixes.
While I have tried and enjoyed many kinds of cement, I have always returned
to the most commonly available and economical cement: Portland Type I . This
or a near equivalent is sold almost everywhere. All the standard information
can be reviewed in text books. I'll add only this.... There are numerous aggregate
variations, additives and treatments for many diverse effects. To seriously
explore this is fun in an alchemical sense. However for sand casting, (as described
here), chemical additives can leach into the sand and waste. For other modes
of cement sculpture, additives certainly make good sense. In most cases, I would
prefer mixing in the largest aggregate which can be accommodated, with all gradations
of size down to the very smallest. One of the admixes of interest is in fact
fine particles smaller than cement particles, as small as a 100 X smaller. These
add density and true bonding, but might not de-water as fast in the sand and
slurry method. Some of theses are by products of metal industry, some are naturally
volcanic and some are specifically manufactured. I found them a bit pricey due
to shipping. Some areas may have surpluses at low cost. They make plenty of
good sense for longevity and improved strength of your work. Key words to search
for these: micro silica, silica fume, pozzolans and the newest similar material:
metakaolin. These super fines should not be breathed, although the microsilica
I bought was stabilized in soluble granules and had no dust at all. Note precautions.
One sad thing is that magnesium oxide cement is not consistently manufactured and widely marketed, most likely due to slow acceptance levels of users. Users are just too busy to make greater efforts to acquire rare cements and transportation costs cannot be justified. Magnesium oxide cement has some desirable properties but has not been consistently manufactured and offered for sale in the USA. There have been small production runs of various cement chemistries, at various times, but these do drop out of the market and seem no longer available when i have had a moment to order and test.
Sand Pile
Since I often used glacial till sand and gravel, (dug from a pit), I generally chose the best gradations immediately available. These have not been ideal gradations by any means and some soft stone can be found in the local glacial till. Improved proportioning reduces the cement paste required. Searching for better aggregate qualities is worthwhile. I have always purchased truck loads and used the pile as extra molding space. One thing to consider with sand piles....Very closely situated trees might have roots underneath, which will try to surface into your pile. Apparently tree roots need well aerated soil, near to the surface. Your sand pile tends to smother them. So if your sand pile lasts more than a year or so, you may find there roots in the sand. Also, outside sand piles tend to collect wind blown leaves, blossoms, etc. I needed to keep sand piles swept smooth to avoid embedding debris.
Storage And Lumpy Cement
The beginner should be cautioned that cement needs very dry storage conditions. There often is a discount in bulk buying, challenged by potential lumping of cement over time. In moderate humidity stored cement can take on moisture and start to get slightly lumpy, even during one month. My bet is that the ultimate compressive strength lost in lumpy bag cement is equal to the force needed to re-pulverize it. (In other words very soft lumps equal virtually no loss of cement strength). Also, bags at the bottom of a stack can feel very hard due only to storage not necessarily moisture. When lumps are getting a little harder to pulverize but still dissolve quickly in water, I am inclined to make the cement slightly richer, almost always by "feel" of all the issues at the moment. Bagged cement usually begins to develop lumps near the bag surface. In some cases, hard lumps can be removed and still plenty of good soft cement remains. For the seriously continuing cement user, I recommend keeping bags in a shed or well drained sunny area. Generally I like keeping one old bag around as descant for the new bags, especially when waves of high humidity happen by. My old bag is usually on top of two pallets with plastic sheet below the bag. An older plastic sheet below the pallet will keep weeds from growing up into the stack. The newer bags can pile on top of the descant bag(s). Next a much larger plastic sheet should cover bags nearly to ground. For outdoors a tarp as well is best, weighted or tied down against wind. I would prefer bulk cement if a steady flow of work seemed possible. I hate wasting the paper bags, which are plastic laminated and can't be easily recycled. Possibly water soaking the bags to extract pulp would interest a determined recycler? I've used some old, harder lumpy cement over the years, generally for less critical masonry work in the garden. Even bags that were years old, and very granular, not easily dissolving, did eventually harden, (taking much longer even for initial hardening). Lumps bigger than eggs I generally throw in to my fish pond to compensate for acid rain. Sometimes old lumps are great for stabilizing muddy work areas or driveways. Here is a 2007 page devoted to this subject.
Reinforcement Notes
Larger shell structures may call for tensile reinforcement like Ferrocement. FC has long been an experimenter's art form which only very recently is becoming code regulated. The essential idea is to finely distribute steel into a thin shell of concrete. FC has only rarely been used in sand molds, having most often been adapted to other mold systems and non- mold methods as well. While I explored many variations of these I presently focus on minimal steel use in contoured thin shells. I tend to prefer wire and smooth bar over other modes of tensile reinforcement. Overlapping meshes or overlapping hooked wires or hooked bars is often entirely adequate for tensile connecting, (in my mind at least). I never sew together meshes any more. To hold meshes down, I use weights like a hand fulls of cement or concrete. Stones serve well on flat work and sticks can hold vertical mesh. Often enough, once the cement has been applied over the whole mesh, it imparts sufficient stickiness to hold the mesh or small bars. The property of thixotropy or tendency of cement to gel soon after placement also increases the tack. An occasional stiff wire-- pin, clamp, clip, crimp, tie or such is also handy. Welding can also be useful with critical bar reinforcement but so much can be done without welding. Generally, time is teaching me that excess steel is not really effective where much less steel can often serve equally well. I build bear sized sculpture by first hand forming a sand plus water core. Then cement is applied to the sand core as a sculpted shell. Steel reinforcement is embedded between according to strength requirements. Short chain pieces can be anchored in for later hoisting. The point here is that endless improvisation is possible with rough and ready technique .Countless suppliers offer a variety of fibres for mixing with cement. I've lost interest in these, primarily due to clean up prolongation and potential interferences with quicker finishing. Also, random fibres are less efficient than anchored bars and wires, my favorite reinforcement. Where mesh is desired, this can be applied just after the first mold skinning described before. My objections to mesh use include..... The difficulty of fitting curves, since meshes can really bend only in one direction. Deforming mesh spherically looses intended, manufactured mesh integrity and is exceedingly labor intensive. Cut mesh punctures gloves easily, wasting gloves prematurely. I prefer using hand woven wire for unique art. Smooth steel is available in hard or soft and in bar stock or ordinary wire. The cold rolled bar from steel yards is good stuff, a little more expensive than soft wire, but rated stronger. I really like the straight long, 1/8 inch, (3 mm) cold rolled bar. These can bend and weave easily by hand, (with a "J" or "U" shaped hook, at ends). You can space them apart and run them parallel or singly. In some cases, weaving makes sense, just a little like an under woven baskets. It's not so hard to learn intuitively. You can poke straight ends in the sand mold for later bending and anchoring in other work.

Preference For Smooth Bars Or Wires
My argument against rebar is that I prefer putting all the steel mass into tensile function, none into intermediate anchoring. Also you can't find rebar in wire sizes. In my mind a rough coat of galvanizing or even surface rust offer plenty of traction. Rebar is essentially steel bar with stamped surface ridges or raised treads. The standard idea has been that these offer better traction between steel and stone. Bent "J" hooks at a bar end seem adequate for anchoring the bar at both ends in my thinking. Additional treads offer little additional function. One effect seems to me equivalent to wedges. Think of the quarry method for splitting stone... You drive a bunch of tiny wedges in a line, that's it. You crack large stone with aligned wedges. Rebar tread stampings seemly introduce a comparable defect into the cement, more so than the smooth rod or wire would. Why add potential defects at all? Smooth rod or wire presents less wedging factor to cement, when it endures heavy dynamic stress. Why not present gentler contact between stone and steel? Why add the complication? Why not put your steel money where the tension is? Why invest steel money in compressive tasks which raised tread stampings suggest? Slipping of steel is not a real issue in thin shell cement. There is no way you can pull well anchored steel out of stone, without breaking something first.
 -
-  -
- 
Cell Like Reinforcement
Reinforcement for thin
shell concrete products is not necessarily needed. Curving structure better
distributes stress whereas thinly flat structure tends to concentrate stress.
Flattened structure calls for more reinforcement to handle stress. As the curvature
gets larger in ratio to the shell thickness, a thin shell surface becomes comparatively
flatter. Therefore less stress is distributed. Therefore deformation is less
resisted. Stress in this general sense implies resistance to deformation. Our
thin shells of concrete have compressive strength dependent on solidity of stone.
Stone has very limited tensile strength, or resistance to stretching or flexing.
Stone depends upon a buttress effect of neighboring stone particles. When stone
particles and molecules are packed more tightly, the compressive strength is
higher. Increasing voids between particles or molecules reduces compressive
strength. Nevertheless, maximum strength is not always needed.
Like the buttress effect, voids enclosed by cellular walls can effectively extend
useful strength. Less material can fill more space. Foams are an example. Foamed
stone like pumice is an example. The principle applies to all sorts and sizes
of voids. Extruded, hollow bricks or blocks have long employed the essential
idea. I would point to truss structures as a similar principal. Three dimensional
trusses, like the octet truss, compare a little closer to the structure of pumice.
Life forms employ cellular structure most elegantly.
Efficient building takes advantage of cellular concepts. With sand molds and
artfulness, larger cellular structure can easily be made. The distribution of
stress can be gainfully planned. The natural curves which life forms model for
us can be copied to advantage. For example, the tapering curves where tree roots
attach to trunk. These are essentially tapered curves which are strong models
for floor joists and roof rafters. All applications of ribbing in a built structure
can benefit from that tapering and curved joinery. Another useful model from
nature is honey comb to strengthen near flat surfaces . Ribbing or studding
integrally with wall or roof can be easy and efficient through sand molding.
Here is a link to some further developments with
cell like reinforcement.
 -
- 
Easy Texturing
Sand as the main mold
material was described because it is generally available and easily gives the
results described. Variations with other earth types and materials will vary
the experience. Spaying water on a sand mold tends to wash the fines behind
the larger surface particles. These larger sand particles will stick to the
slurry and give a sandy texture to the finish. This tends to hide unintended
irregularities as sand textured paint does. Instead of sand usage, finer soils
can be used as mold surfaces, to yield smoother finish. Clay can be sprayed
onto a sand mold and the clay can be elaborately smoothed before pouring or
spraying the cement. I rarely spent that much time with molds, wanting to make
a good wage with simpler production. At the other extreme, gravel offers pebble
coated finishes. This is easily done by having a preferably graded gravel pile.
Molds are simply hollowed out and poured. If pebbles are too unstable, a few
hand fulls of sand can stabilize a small mold. The the sand will wash behind
the pebbles easily. The cement can then properly adhere directly to pebbles
without more voids. Still another approach would coat a sand mold with selective
pebbles and pour.
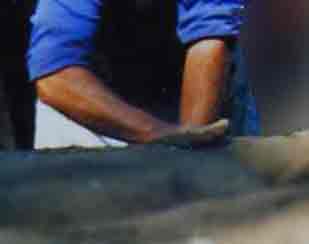
After the cement / concrete has been formed, compacted and dewatered in the
mold, the exposed surface can be finished. Often that condition has been adequate,
in my mind, with no further treatment. One very nice surface treatment is to
simply spray lightly, misting is better yet. The fines will quickly wash away
from the surface only. Now larger aggregate is exposed. Curved work will always
drain these fines . The resulting pool of fines and water can then be vacuumed
out, or perchance they will drain to mold edge. One can leave them or scrape
them away, (the water having neatly drained into sand). Another popular wall
finish half mists the fresh cement surface to leave fine patterns of exposed
aggregate outlined by wavelets of cement fines. In this case, barely enough
mist is applied to wash a small area, and the run off is insufficient to stream.
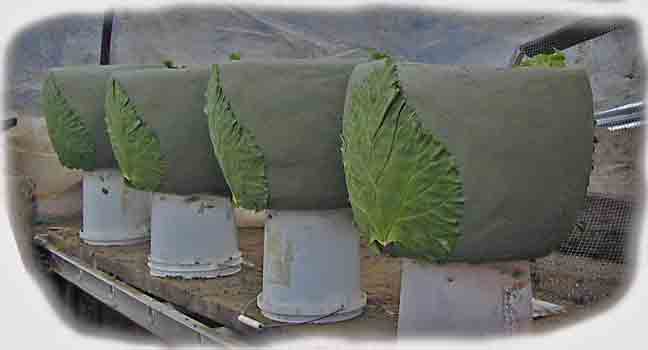
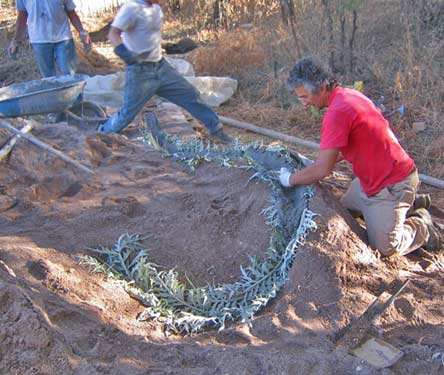
Still another very popular finish is fossilized leaves. Beautiful patterns
are
obtained from leaves of almost any plant or weed. Leaves can be carefully placed
on sand molds and poured with stiffer but not too course a mix, (and preferably
no excess water in the mix, except to compensate for evaporation during pour).
Concrete with larger aggregate can be applied after coating the leaf surface.
The leaves produce fossil effects which are prized by customers and clients. I
also sold many basins which utilized pretty patterns found inside and outside
select tires. Additionally, tire inner tubes offered a completely new dimension
for other molding effects. For non-earth, nonabsorbent molding it is very important
to use low water mixes since excess water will tend to group and become trapped
at the nonabsorbent surface... This will appear as voids on your molded surface.
Visible voids like this suggest that your thicker sections might also have
voids
and this affects the overall strength. I combined sand molding with inner tube
and tire molding, so I applied wet mix to sand and drier mix to the rubber,
within the same product. The rubber needs mold release. Economical releases
include diluted soap, wax or grease. Solution was painted on and allowed to
dry. Application of cement could not allow much disturbance of the rubber surface
to avoid allowing these releases to absorb into cement. Spraying on a gel coat
of cement before cement application, gives the smoothest result, but I rarely
fussed that much.
 -
- 
Polished Contours
Lastly I mention a form of surface smoothing which can be carried to the extent of a polished effect. It relates directly to steel troweling to a smooth finish, (check regular concrete texts). Curved sculptural surfaces can likewise be progressively smoothed as the cement proceeds through stiffening. This pre-cured smoothing can be done in phases. Small foam rubber rollers work reasonably well on exposed freshly placed, wet surfaces. Rubbing with gloved hand is also effective even through stiffening phases. Rotary polishing tools with woolly pads are good for stiffer phases. More cement paste can be added if needed later during the pre-cured period. Still another tool for this polishing might be "fiber blasting", a tech I have not explored much. Material such as fine saw dust or wood flower can be blown through sand blasting equipment to polish tenderly firm cement surfaces which are intricate and otherwise difficult to polish. Timing and temperature are very critical with any finishing. Smoothing and polishing is much more labor and equipment intensive but worth it for some people. Sanding with wood finishing tools is also a workable method, for example when the hardening gets ahead of us. I tended to focus on the simpler methods. I prefer an aged styling which can not readily be placed. It therefore mystifies and suggestively points to imagination, an area I enjoy. Color Pigments are easy enhancements which can be used mixed as slurry coatings, or call it "cement painting" . These tend to produce earth tone colors. These are sometimes embedded throughout the entire cement body. I have preferred pure, chemically stable oxide, powder pigments over other preparations since this gives me the alchemical advantage. Pigments should be stable, minerals with no adverse chemical or fading reaction. There are countless premixed products which include cement enhancements such as water reducers, super-plasticisers, self leveling agents and, extra hard- solid fines. One should always test new concoctions to access performance. Color matching is notoriously tricky from batch to batch, so be forewarned. I haven't minded color variations which for some of us, adds to the timeless quality of stone work. My pure pigment source was the only pure pigment source for my region, Davis Colors, 1-800-3469433. They might eventually find a distributor to mail order small orders, if enough small buyers encourage them. They will try to help you locate suppliers, but you need to be very persistent if you want to regularly buy small quantities of a wide array of color. In the mean time they have $300 minimum orders. You can try a nice range of generally earth tone colors. Your other handy source is your local masonry/ building suppliers who most often carry only red and black pigments. I have mixed various pure pigments with no problem.
Stains and glazes of countless concoctions also add possibility. This is more
of an alchemical area I am reluctant to recommend. The very easiest thing to
try for brighter than earth tone colors, is to use what might be termed high
solids paints. A rough and ready formula could simply be white portland cement,
(more expensive), combined with colorants, and perhaps a super high range water
reducer to help achieve a better surface. Selective pigments are very durable, from companies like Davis. Additions like very fine but hard
sands will reduce shrinkage and boost strength. Greater care need be taken for
moist cures, not too hot early in the cure. Companies will send sometimes samples,
if you sound serious enough. Still another alternative admix, (don't combine
with other chemical additives), is latex or acrylic. These can be mixed in a
slurry with color and fine sand, then painted over surfaces. These plastic admixes
want only one day near moist cure and then should dry for a week to cure properly.
A wild card colorant whose chemical composition is not always certain is your
local paint store paint colorants. Usually an attendant won't mind giving
you
a little in a small container, dispensed from their machine. You should provide
a suitable small liquid container. An exciting range of colors can be easily
had this way, perhaps at modest cost. However, even with white Portland
cement,
the color will fade considerably, since too much colorant will weaken the result.
I would be sure to ask for colorants used in water base exterior application
paints, (though one colorant may be used for both). While the chemistry
may
be unpredictable, I think this approach is better than using acid etching stains.
Test with small wafers before doing much more. For a glossier effect, you
can
buy the paint store stain base which is clear resin like liquid and add the
colorants yourself. Painting with "high solids concrete sealers" is
a quick way to add gloss and perhaps even to seal moisture in for better
cures.
There is a very wide variety available. I have tried just plain linseed oil
with pigment which proved durable for years outside, on a protected wall
surface.
(One coat of linseed is less glossy). An interesting, truer stone glaze idea
for that translucent, glossy, porcelain effect might be Porcelite TM. (http://www.porcelite.com).
It is sold as a cast able but I bet you can paint it. It is said to work
with
glass beads and colored sands and sounds like a nearly translucent, refined
stone effect. It's expensive and I 'm not likely to use it unless that
penthouse
job comes in. ^_^ Back to sand casting....
Curing Cement Sculpture
For specialized cement materials I usually review instructions for each new cement product, at least when things
are critical. From there I plan my timing. Portland Type I is said to cure for
30 days, but can be quickened with application of heat. Too often in the contracting
world I have observed that concrete floors are cured susceptible to premature
drying outside. Dry, hot and windy weather can weaken strength results considerably.
So coating fresh cement with sprayed on sealers is sometimes critical to getting
good results. Thin shell concrete is more needy of all the strength available
from it's cement, which can only be maximized with moisture conserving cure
conditions. Time and temperature are the primary factors in how long it takes
cement to cure. The more of either, the more the cure, which theoretically tapers
off with infinitesimally additional strength gain for 50 or more years.
Sand or loam can also advantageously cover the cement sculpture to conserve
moisture during cure. After pulling small sculpture out of the sand mold, I like to nest my smaller products in a stack. I do not brush the surfaces yet
(and also leave any leaves for fossilization intact). These provide extra holding
power for moisture during the cure. I fill any freshly molded basins with a
little water. Then I wrap the stack with plastic sheet. I simply overlap the
plastic and clamp it shut, in close pin fashion. When needed I can add water
through the top from a garden hose spray. This keeps humidity high inside. The
sun will then heat up the products for an accelerated finish cure. Where the
entire mass can heat up almost too hot to touch, I consider a day or two sufficient
cure finish time. (More days if lower temperature is reached). Larger pieces
are best left in the mold and covered. Where plastic sheet is not desired, a
layer of earth is a great substitute . More watering and time will be needed
to compensate for evaporation. Combining damp, sandy, papery or cloth like material
with plastic vapor barrier is even better. Cure Testing
Testing is usually not necessary especially with ones accumulated experience.
Beginners would do well to experiment with tests, just to gain experience. Experienced
builders benefit from casual testing just to monitor curing status of their
work. For rushed jobs, new materials, or for critical work I adopted a simple
and reliable test method. I use small leftovers of mix which cured along side
with my work for testing the cure status. My primitive style of testing is to
break and observe which aggregate have split along with the cement. If hard
stones have split, the sample passes. If they don't split, the sample proves
uncured or weak. (Where they don't split, you see aggregates have pulled out
of one side). My glacial till for aggregate has many stone types, some stones
are stronger than others. Glacial till can include some very weak stone. My
main use for testing is usually just to assure myself that the piece has cured
and that moist curing time has been sufficient. When strong aggregate split
in your test piece, then you know your concrete has reached that level of strength
already.
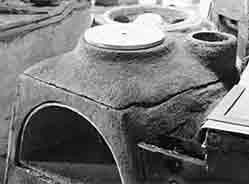
Fireplace And Oven
Refractory materials are preferred for high temperature products because they withstand the entire range of temperature up to candescent heat or near their fusing point. Portland cement withstands some heat, but use of silica based sands and metal reinforcement introduces incompatible expansion rates. The steel expands more than the cement at temperatures just below candescent heat and tends to expand. This can stress the cement. Using fire brick sand or compatible aggregate all improve heat resistance somewhat. Near 50/50 metal alloys of and nickle and iron , some with doses of other metals reduce the thermal expansion remarkably. These alloys can be suited for stone or glass, to avoid disproportionate expansion, where it matters, (as supporting light filaments). But Portland cement does depend on it's hydraulic bond (or water) to remain solid. Loosing water at high temperatures and over time will weaken hydraulic cements. Refractory bonded cements are available at higher cost. Adaptable to the sand and slurry trick are fireclay mixes and hydraulic, calcium aluminate cement. Hydraulic cement brands I am familiar with are Fondu and Secar for refractory temperature service . When mixed with suitable aggregate like firebrick sand or corundum sand, these works as a hydraulic cement. If later, slowly fired to respective fusion points these will fuse as a ceramic (above candescent heat, check directions). The main trouble with cements like these is that you cannot fire short of the fusion temperature without loosing your hydraulic bond so you almost need a ceramic kiln for elevated firing to regain good strength. This proved too costly for my budget. For low cost casting, suitable fireclay mixes (clay plus fire brick-sand or grog), without hydraulic cements, are probably the best solution. Applying fireclay mixes to sand molds is somewhat a hybrid version of ramming. As the mix dewaters on the sand, the patting acts much like ramming, which itself is a wide www searchable building method. (Earth ramming for houses and refractory ramming mixes for high temperature work). The sand mold allows easy construction of curved ovens. Commercial brands of refractory clay mixes may give great results. Years ago I used products from: A P Green Refractories Inc , Green Blvd, Mexico, MO 65265 ... They produced some especially low cost mixes which seemed to be fire clays mixed with firebrick aggregate. One of these in particular seemed not to suffer at all from incomplete ceramic firing. Today with all the corporate take-overs, it might be difficult to find these older mixes. Fireplaces and cooking ovens rarely if ever reach candescent, industrial levels of heat, so low cost mixes are perhaps worthy to explore. I explored a number of higher costing industrial mixes and failed to invest in proper firing to attain good fusion. Portland cement makes good chimneys, although ceramic liners are important for heavily used chimneys, (cold climate, wood fire use). For light barbecue use, liners may not be wanted, although inordinate grease buildup could cause a damaging chimney fire.
Good Occupation
The simple earth molding method described here provides a healthy mix of physical exercise and probably just the right amount of employment if you need income. Sculptural work can exercise the human body in a balanced way, so that we don't over repeat the same identical actions too often. I love opportunity to work with flowing and rounded shapes. The least lovable parts for me were mixing cement and selling products. Nevertheless, considering that I work and live far from good sales locations, the business was still very favorable. Mixing dusty cement outdoors or with exhaust fan allows some avoidance of the dust since the dust cloud can be seen and avoided. But someday, getting a bin system or half ton bag system with mechanized metering of mixes, would sure be nice. I especially dislike the cement dust. It should not be so hard for a manufacturer to supply low cost, reliable metering equipment, just right for the small user. In time I might improvise my own. This would boost my production way up, and my spirit also ;)I love simple sand molds because little time and material is wasted while the environment and worker are less taxed. The sand holds moisture for desirable cement curing. Mold and product are separated easily and brushed off later on. Sand is recycled anew, just add water. This system adapts both indoors and outside, in a tent, or in the sun. All ambient conditions have advantages and cautions to learn about.
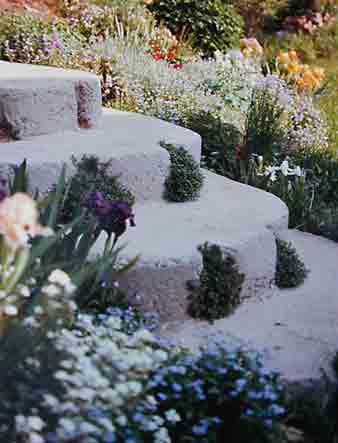
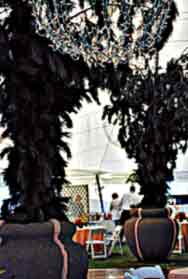
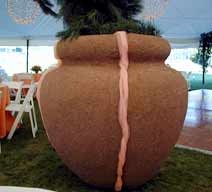
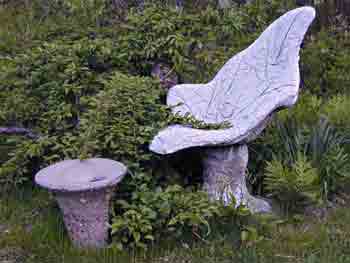
Bo's 2008 page on "sitting planters". Suggested as a way to garden and of special interest to retirees and sustainable lifestyle enhancement.
This was a two day work job for me, arranged by a book publisher based in a giant warehouse. I simply had to drive to the warehouse section, and demonstrate some sand casting, all in less than 20 hours. I'm not sure what happened to the castings, which were not especially notable. The text author sat at a table, taking notes, while a photographer took some photos. Some specific information on my sand casting technique was published in a resulting 2007 book. This 2007 book documents some of my sand casting and ring reinforcement methods. Many high resolution color photos show multiple steps of forming 5 easy to make pieces-- Easy examples, which call for a reader's personal, imaginative input. It is close up views of the process. The publisher did not hire me to develop imaginative input. Rather I was hired to rushed together what ever transpired over those 2 days, without my further participation. The rough texture product fits naturalized, somewhat wild, gardening styles, not the highly trimmed, polished-manufactured stylization. The text author and editor were employees of the book publisher and warehouse owner. I'm grateful for the income and adventure it provided, but this is not a serious book. There was no proof reading allowed, so my only recourse is to offer the following notes:
ISBN: 9780764328671~~(Retailer Links)
Pages 8 & 9 The mix formulae terms are technically jumbled, but the context is forgiving. The mix recipe given in this book is not what i dictated on that day. On the several days that we collaborated in producing this book, inside the publisher's warehouse, my co author took notes while i labored. The given recipe might have been confused with a discussion about "permeable concrete" or "porous concrete" or "pervious concrete", where sandy aggregates are omitted). I am not a purest with general mixes and most often use approximate measures like handfuls, when mixing small batches for sculpture. The publisher hired me to demonstrate sand casting and i thankfully accepted the job which lasted several days. My highly educated brother pointed out that i should have demanded editing, but i dislike asking a publisher to dump books, just for this and then print new ones. I much prefer the idea of publishing new books, with a better budget.
I perhaps should have methodically presented an official mix recipe list but there are variables and specific contexts worthy of another chapter. Cement-rich mixes are appropriate as long as the size of the casting is not too large and as long as the shrinkage is proportionate in all parts. Shrinkage due to rich mixes is almost imperceptible in small pieces of work. Heavy steel reinforcement in larger pieces can unhappily resist cement shrinkage, causing cracks, (because the reinforcement will not shrink with shrinking cement). My wire reinforcement rings can better tolerate shrinkage, much better than linear reinforcement geometries. Large, contiguous, concrete floor shrinkage is very noticeable. Therefore large scale concrete practice emphasizes just enough cement paste to "scientifically" fill between aggregates and in this manner avoid shrinkage, (while also conserving on resources).
Page 10 The copper coating on MIG welding wire is probably just atoms thick and therefore does not prevent ordinary corrosion. Yet it does resist humidity for a short period of time. This is perhaps a minor issue, except that if one stores the wire after the plastic hermetic seal is broken, it will corrode, almost on any shelf, except perhaps in an arid desert climate. Copper is actually fairly reactive in terms of bonding with building materials. Yet when thoroughly encapsulated in cement any such reaction is insignificant and likely stable in the sense of durability, as long as the piece is not broken (to expose wires through damage or cracks). Normal concrete porosity is generally too small in pore size to permit ordinary corrosion, except where unusual extremes are encountered or where, for example, the whole structure acts like an antenna and electrically exchanges regular charges between ground and atmosphere. (See here and here for further corrosion study). Even a lawn sculpture can conduct minute electrical charges, just as trees or mountains or lightning arrestors do. Corrosion may manifest over many decades or much sooner in extreme conditions. Steel rust can accumulate to a point of rupturing thin cement, but on the other hand ferrocement boats using simple cement, with bare steel wire, have lasted and sailed for very long periods of time.
As I am only a partial author of this book, it is possible the following was avoided, but it is an extremely important point in my opinion:
Page 12 Another point i tried to stress was only partly covered on page 12. I attempted to explain that Portland cement manufactures ensure that the bagged Portland cement absorbs atmospheric humidity which considerably reduces cement quality. Hence, more cement is needed to compensate for lost purity. Note the lumpy nature of the cement (powder) product in the picture on page 12. Look closely at the paper bag with plastic lining. The picture clearly reveals countless small holes punched in the bag by the manufacture. These holes eventually admit humidity and spoil the cement powder product. I have been told by a chief engineer at a cement fabrication plant that the holes were desirable to ease filling of bags and to prevent product caking... No evidence was given. No evidence can be found or proven, is my belief. He rejected my point that humidity enters through the holes. Look at the lumps in the cement product, which should be powder instead of lumps.
Further rant: Frankly speaking, planned obsolescence is a very wide spread practice in our sorry world. Though our world may become destroyed by many, self-destructiuve, human activities aimed at boosting profits, key people will look the other way in hopes of preserving income and assets. So be it, we will reap what we sow and reap our own destruction as well. If the least of people among us, or the completely indifferent people, fail to sow anything, but instead only reap, these people will reap the ill-planted harvests of others. My point is we, each of us create reality knowingly or unknowingly, by commission or omission. It is our reality if we perceive. It is our's to manage responsibly and to inform ourselves about, in all respects. As the accumulation of human misdeeds grows to a critical point of collective, massively complex ecocide... We are all complicit in our lack corrective efforts to harmonize the world. If we do not work to harmonize the world, we will be stuck with dissonance to work with. My own humble efforts with building and writing about building, is my effort to harmonize.
Click here for a short article on Ferrocement Faux Bois, (a page with some photos of a restoration job i got in the year 2000).
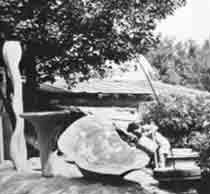
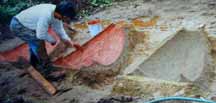
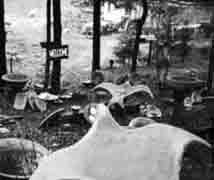
Bo's Large Snapping Turtle Concrete Sculpture 2005 .... ACI 2005 Gold Award Winner

Bo's Competitive Concepts For Building "Green" (Globally Efficient).
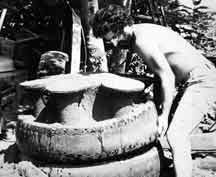
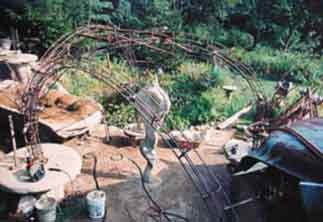
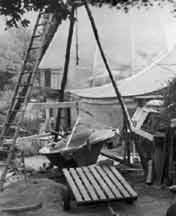
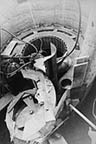
Other Concrete Sculpture Methods
Besides sand molding, I also love forming concrete in in free air like a mason. I usually use welded steel skeletons, as seen in my building shop picture. Another sculptor once had me clad her styrofoam and paper- mache sculptural skeleton with concrete. For this we used latex modifier to give the cement some integral reinforcement. The latex modifier for cement increases the cost of materials, but saves labor of reinforcing and speeds curing. The styrofoam remained inside and we built the large statue in place to avoid moving it. This worked beautifully. Using styrofoam as a light weight aggregate is gaining popularity. Recycled foam packaging material can be chopped up or used directly as "styro peanuts". Commercial styro aggregate is also available, also web searchable and now called eps. These make cement much less droopy for free air sculpting. The result is weaker than solid stone. Recycling styrofoam as an environmental solution appeals to me but the chemical instability of this and some other plastics does not appeal to me. So long as the placement is not within an enclosed living space, I suppose there is no harm.
Bo's catalog, showing sand cast products sold in the 80's and 90's. Customized production of anything, available by request.
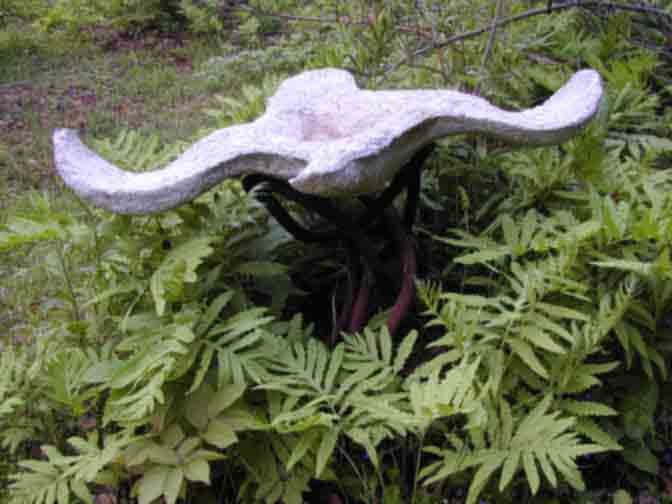
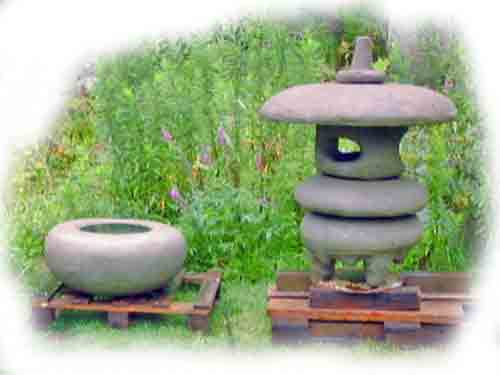
Below: Artichoke leaves in sand cast lantern stand, for the Flyingconcrete 06 Workshop.
Note: These pages are placed in the The content on this website, http://harmoniouspalette.com, is placed in the public domain only as a free exchange of ideas and as a "hard studied wish to serve life". The author assumes no responsibility for the improper use of the concepts in these web pages. All relevant laws of life and local codes should be verified and observed before any building or experimentation proceeds. discussion is welcome, please write. Bo Atkinson
