This page discusses moderately priced power tools for mixing mud in common plastic pails or rubber pails. This is a more efficient power tool method than using larger mixers, for working alone and sometimes easier for small work crews, because there is less clean up and more versatility for lifting mud to heights above, which are advantages in hard labor. There are many types and qualities of mud which led me to experiment with differing mixer geometries, as presented below.
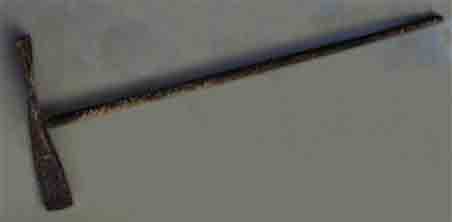
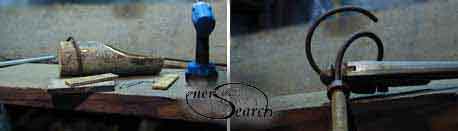
Simple "T" shaped drill bits have long been used for stirring wet mixes. First picture shows an old rebar shaft with flat metal piece welded at end. Flat mixer impellers are convenient for storage, packaging and shipping. The auger form of mixers have been used and I explain some findings on the helix geometry, for the mixing of mud, especially the most difficult materials like large aggregates, (or particles) in mixes.
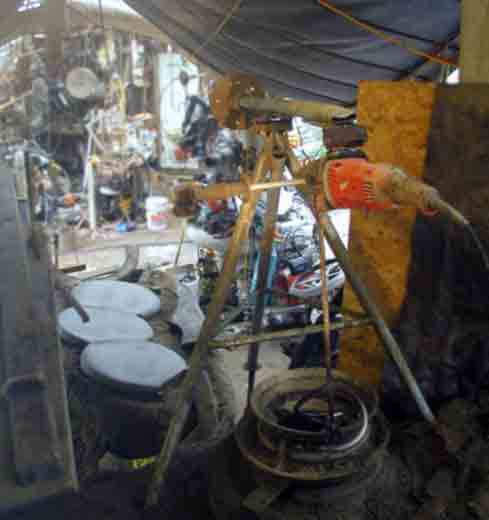
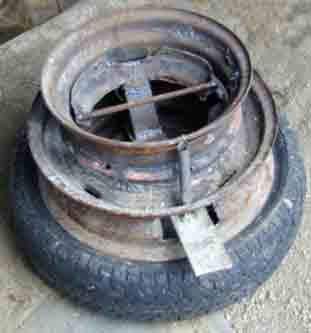
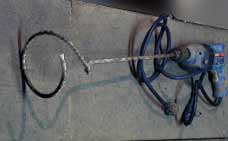
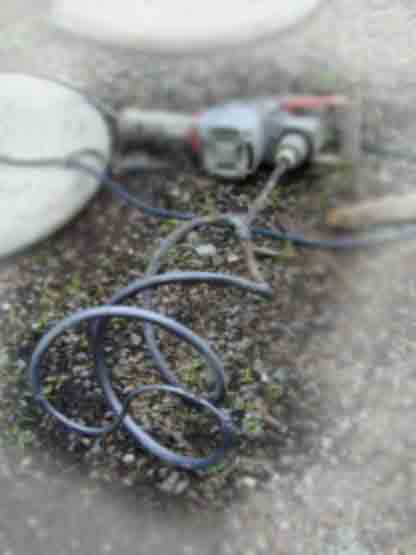
A spinning "T" shape bit will center pretty well into a cement mixture. More blades than this could consume more power which adds burden to hand held drills. Flat metal ends were here twisted a little like a propeller or fan to polarize vertical movement. The fan twist, itself, does consume a little more power but adds an "up-down" option to mixing. Sweeping a bucket bottom is important so as not to build up unused ingredients. Yet the typical bucket bottom is not really flat. An impeller shape can be bent or ground to conform with the bucket bottom. Smooth welding of the fan like blade is very helpful. Nuts and bolts tend to encrust on parts of many other cement mixers. Thicker mixtures, sticky or stiff mixes all resist fluid propulsion. Spanning the full diameter of bucket can propel a full bucket of stiff, barely fluidized mix, but this consumes considerable power, (perhaps 3/4 hp at 300-500 RPM). Fibers tend to hang on straight edges and long fibers can wind around shafts. Typical drills spin too fast and variable speed drills reduce the available power at slow speeds. All drills burn up if you overload them, (if RPM's slow down too much). Driving impellers into stiff, gravel like mixes can easily overload a motor. For occasional wet batches one can overlook the overload (and hope the motor didn't heat up too much). A new model angle drill "The Superhawg" is rated for 13 amps and mounted on an experimental tripod holder (picture below). This portable tripod holder hinges with a counter weight for easier operation. The Superhawg can handle a wide variety of mixes, (including a full bucket whirlpool mode), without exceeding 13 amps of power consumption. Should we assume manufacturer rating is important? A Fluke 36 Clamp On Meter was used over several occasions, to digitally measure actual power consumption. Observations will continue through 2004, using different impellers, motors and mixes. The holder is made from junked auto wheels with a hinged foot pedal to resist bucket spin during full bucket whirlpool mode operation.
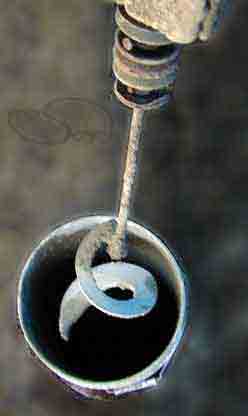
The easiest mixer impeller to conceive might be called the "TZ Mixer", (morphing the letters t and z). It will be compared for mixing mortar and reports will appear here in future. Actually it could be viewed as a flat helix mixer. Just two bends are needed and that is really all! It can be formed in many variations like a "2" shape, etc. The impeller with red background, picture below, rotates with a 5" or maybe a 10 cm diameter which is small enough to test with a battery powered drill. If the drill has a dial with numbers, a beginner can set for maximum torque. This will protect both wrist and motor from overload and might help a person decide if it is safe to proceed with bigger drills and heavy work. But for reasonable production use, the question remains, what tool set is most efficient in electrical use, human muscular use, and environmental impact? The second picture below with white background is sized for full bucket sweeping. Initial testing suggests it might be difficult to run this smoothly with difficult mixes. It can be turned with a 7.5 amp Hole Hawg drill at 300 RPM, but current draw can easily exceed the rated 7.5 amps.

A general observation is that 7.5 amp, 300 RMP Hole Hawg drill with impeller bits which span the full width of bucket width can surge very high. Surges with reads up to 20 amps have been observed. The average meter reads for low slump mixtures, full bucket whirlpool mixing have been well over 9 amps. One work around is to always use high slump, very fluid mixtures, to avoid power surges. (High slump mixes may or may not suit job criteria). For comparison, impeller/bits which span closer to half the bucket diameter surge much lower in power consumption. Power surges might not hurt during short term, intermittent uses, where the motor may cool down between brief surges. Damag e might occur if continuous operation heated the motor too much, (especially at hot weather, multi user work sites). A 13 amp Super Hawg angle drill ($340 angle drill, toolsforless.com), has seemed not to surge much over it's rating, compared with the smaller HoleHawg drill, (with same impellers). More observations will be posted later in 2004. Presently it may appear that for stiff mixes, full width impeller bits in drills need 13+ amp ratings or about 3/4 hp, (for typical drill speeds usually from 300 RPM and faster). Another way around the problem is to use slower turning gear motors, (slower than usual drill speeds but possibly too heavy for hand holding, because gears add weight and are often cased in thick, heavy iron).
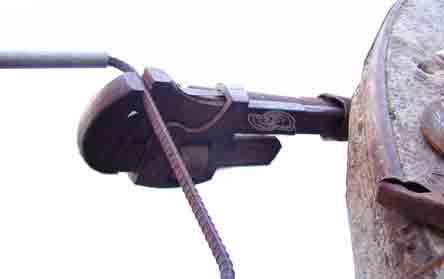
The next picture below shows how an adjustable plumber wrench can be used as a bench vice. The ferroconcrete table has pipes embedded which can easily receive wrenches to use as quick bench vices or holders. At the upper left of picture below, is seen a piece of steel plumbing pipe slide over rebar to keep rebar straight up to the bending point.
Bakers were possibly the first to use very slim spiral bits to mix stiff dough. Dough mixers are slow compared with drills. Faster- smaller drills are not recommended for heavy work, but smaller helix/ corkscrew bits lighten the load and improve the range into sticky or fibered mud. A fraction of the bucket content only is mixed at any given time. Hand held, the cork screw can dig down through stiff material and bring bottom layers topside. The helix can travel around the bucket inside circumference. This consumes less power but also calls for better strategy, where heavier production and speed are concerned. Strategies do vary according to what mixing is needed. Poor strategy can slow mixing progress. One workable strategy is to first add wet ingredients, (especially for special additives like water reducer or color), then start drill held by a stand, then add cement paste, then stone, then sand, through a funnel like feeder. (It really can vary according to many criteria). For example, bagged cement often comes with soft lumps. It is easiest to break the lumps down with all mixing water added first. Having the corkscrew to one side of bucket will turn the bucket but with less force than would a full width impeller. The self turning bucket results in all material getting mixed as it passes a stationary corkscrew. Alternatively, for small drills, the helix is allowed to travel around the bucket. Care should be given to sweep all bucket areas which will require some mental concentration. Following are proportioned corkscrew drill bits which work in cement or concrete mixing. These can be made for pennies retail or with old steel scrap. No welding is needed to make a cork screw shape.
Above: Generally, distance between each cycle or turn of helix could measure near to it's diameter. A slope around 20 degrees, is presently being tried. (This is steeper than car springs originally tested). A slightly tapered, wider at bottom helix is preferable. Rebar corkscrew to left has 3 turns and "bottom scraper fin" for strong drills (10amp+/300RPM).
(If the helix is liked, further modification can be tried. A fin welded at the tip can force the mixer to "better-clean" (hug), the bucket corner. The tip wears away most of all and could be hard faced with alloys, (simply welded on). Diameter can be over half a bucket wide. Middle corkscrew has diameter narrower than half bucket diameter for use on faster and weaker drills. )
Corkscrew to right has one and a half turns with half bucket width, as a trade off to allow faster, weaker drills to sweep small volume mixes low in a bucket. Full immersion into mixture reduces wobble of a helix supported at one end, (drill). If less than a full turn is fully immersed, then the helix whips around a little. For a quart or two of mixture re-tempering, left overs, a gloved human hand or else hand tools might work best.
A bender is presented below which is easy for those who like this sort of work. Only people who enjoy the work should try this. One person has complained it was difficult. A person who can't afford better equipment will enjoy the cost savings, since, with determined skill, it is easy to do. Cold bending of steel bars is a valuable skill for sculptural work. First picture demonstrates use of a salvaged plumbing pipe used to hold rod while keeping the rod portion inside of it straight. (The pipe still has part of the original threaded fixture which was kept there retaining more strength at it's work end. A pipe wrench is shown grasping a free end, ready to make an initial, approximate 45 degree bend. (Two junk yard plumbing pipes work well if you don't have wrench).
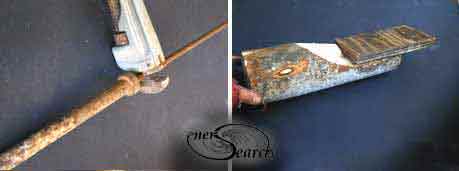
The second picture shows a stick of wood whittled at end. Kind of slanted from bark to a flat area at stick center. A scrap of ply wood can be screwed over the bent rod and the flat area to assure centering. (Shim or groove with the same thickness as rod , in this case 3/8ths inch diameter or #3 rebar,(1cm). Ply wood scrap is not necessary if you have a strong clamp and can reasonably center the bent rod.
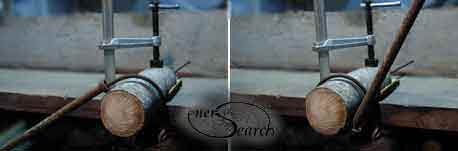
Next the (assembly of ply, shim and) whittled stick is clamped to a firm surface, (with ply flat to surface). Pipe is used to grasp rod and bend around stick. Pipe is pulled back as rod turns around stick.
After bending, the clamp is removed (and/ or temporary wood screws also). The corkscrew bit has been formed. With straight end in pipe and wrench, the angle can be adjusted to form a good rotational balance. With #3 rebar, it is easy to adjust angle by hand. #3 bar may wear down through heavy use. # 4bar is stronger, but also will want more drill power and skill to bend. (Shims and wood screws may not be needed if a groove is carved in the whittled stick first).
Heavier drills are geared down (often around 400 RPM--rounds per minute). (Electric motors are inherently fast and often need gearing down which adds cost to drills, but increases torque. Cheaper drills have insufficient built-in gearing). The corkscrew offers some worm-gear effect. Overloaded drills burn out. Gearing is the key. Drill or motor gearing can more than double a machine cost. Corkscrew geometry somewhat self gears and eases mixing of sticky, fibrous, stiff and/ or bony concrete. The frontal impact is converted into sleek lifting motion. Sleek piercing will allow fragile, sticky and difficult ingredients.
Rebar usually has two "ribs' running lengthwise. It is probably advisable to file just one of these at the drill end. The remaining rib can "lock" between two chuck teeth to resist slipping. Three "ridges" at shaft would help drill chuck hold tighter. Precision grinding the end to a triangular prism is another method used on drill bits sometimes. If you don't have a lathe for precision grinding, bad centering in drill chuck can be wobbly. Wobbling can loosen chuck. It is a hassle to keep tightening drill chucks in the middle of serious cement work. If the chuck is already old and worn, If you can't stand the time waste, weld the chuck to the shaft, (cringing while welding a drill chuck forever closed, ideally an old junked chuck;) Oh well, that solves major frustration when tired of tightening chuck every ten minutes, ( a likely hood for stiff low water mixes). Building up three ridges with a MIG welder might be best, to save a good chuck. Chucks hold best on the bigger shafts-- welding on three ridges or beads preserves the shaft diameter. Ensure that the shaft surface is not altered where the three chuck teeth touch. The weld beads themselves are not precise, but the original shaft ensures uniform geometry for chuck to grasp.
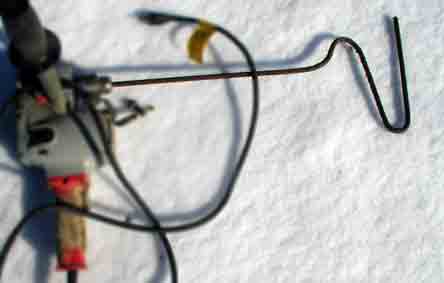
The first helix below was cut from a "flight" which is a flat ribbon like helix. It was cut and sculpted at the bottom tip with alloy welding rod. The bottom tip has a slight fin- like shape to it which helps veer the tip closer to bucket corner. This mixer is mounted on a 14 amp, (120 V) gear head motor, which in turn is mounted on a hinging stand.(To see this stand, click here, and scroll the down page). Additional impeller models will be built and pictured in future. Sculpted impellers will incorporate some cement, in part "ferrocement". The tip is the part which wears most noticeably. The second picture below shows a double helix bent from half inch, cold-roll bar stock. A smaller "S" is welded at bottom to sweep bottom of bucket. It would overload the Holehawg in heavy mixing, but works very well with light mixing. A 200 RPM, 14 AMP drill would likely handle heavy mixing very well. More reports should eventually follow.
Special Acknowledgements: Ferrocement discussion list, where many issues of cement and mixing were discussed, all of which inspired closer study. Individuals on the FC list most deserving of acknowledgment were: 1) A person naming himself "Onebone" who introduced the list to the "Holehawg" drill for full bucket whirlpool mixing, hand held! (I had previously used a stand mounted gear motor for full bucket whirlpool mode, but a hand held example was intriguing). 2) Another individual, Richard Austin, introduced wire stock in a helix shape for whisking mixes, primarily without use of a drill. 3) Peter Epperson introduced the idea of using a soil auger for mixing concrete. The interest in bucket mixing grew slowly, but more people have found advantages in bucket mixing. As the years passed by, some simple misunderstandings on the FC list seemed helpful to the creative incubation there. Dare to be naive, and we may somehow learn something new.
Car springs made into "S" shape impellers, also the earlier corkscrew , gear motors and yet another mixer holder.
You might not fit that spray shovel into a bucket, so why not try using a simpler spray lid adapter which could work more simply still. Just remove mixer and put on this spray lid. Heft it to shoulder and shoot like bazooka, (swords to plow shears).
Mixing cement in a bucket ensures fresher mud without extra transfer work. Cleanup is fast, waste is minimal. Today's affordable drills can even run off solar panels. First a warning is given: Hand held power tools can overwhelm either a user or the power tool. A beginner should approach this work with great care and personally assume all risk. The pages of this website are offered only as a free exchange of personal experience and evolving ideas. Also, making mixer parts, like any art form can take much longer than one wants. The needed inspiration can come from the satisfaction of experimenting and "do-it-yourself" interests.
Comments are invited and consultancy is offered. These research reports are in the The content on this website, http://harmoniouspalette.com, is placed in the public domain only as a free exchange of ideas and as a "hard studied wish to serve life". The author assumes no responsibility for the improper use of the concepts in these web pages. All relevant laws of life and local codes should be verified and observed before any building or experimentation proceeds. discussion is welcome, please write. Bo Atkinson and are furnished "as is". The author makes no warranty, express or implied, for any purpose. The author assumes no responsibility for the use or misuse of this research. Bo Atkinson Tel : 207 342 5796 . . . (Maine USA)
E m a i l- boa1@pivot.net ___ Spam filters are in use, if your personal email doesn't get through, try calling: 1-207-342-5796. Unsolicited sales which are not directly related to discussion of this work are not welcome.